Showing posts with label salad. Show all posts

Monday, October 3, 2016

Tomato and Fresh Shell Bean Salad

This wonderful salad introduced me to the idea of cooking with fresh shell beans, and boy am I glad it did!  


Many shell beans are the "just-picked" versions of beans that we normally use in dried form.  But compared to dried beans, fresh beans have a wonderfully creamy texture, are quite easy to prepare (no soaking required), and they cook in no time.  Fresh beans do need to be removed from their shell, but this is an easy task, especially when done on a lazy Sunday afternoon over casual conversation.  (Not feeling especially chatty?  Consider the task an act of "mindfulness.")  Fresh beans are available in the late summer/early fall at many farmer's markets.  I recently bought some from Berried Treasures at the farmer's market in Union Square.  These beans might not catch your eye in the market, unless you are in the know (and you are now in the know!).  I usually look for pods that look a little bit dried out, which is a sign that beans inside are plump and ripe.  But the stem should still be green, which is a sign that the bean was recently picked.  Fresh beans can be stored in a paper bag for a few days in the fridge.

These unassuming beans should not be overlooked.

Recipes adapted from: David Lebovitz's Fresh Tomato and Shelling Bean Salad and his Basil Vinaigrette

Ingredients for the salad:
  • 2/3 to 1 cup of shelling beans, shucked (you could substitute fresh beans for dried or canned Great Northern beans, but where's the fun in that?!)
  • 4 small tomatoes
  • salt
  • a bay leaf or a few branches of thyme (optional)
  • microgreens, for serving (optional; I prefer a slightly peppery mix)
  • basil vinaigrette (see below)
  • french baguette, for serving
Serves 2.


Directions:

  1. In a small  saucepan, bring water to a boil, then add a dash of salt. 
  2. Add the beans and optional herbs to the pan.
  3. Reduce the heat to a low boil and cook the beans for 20-35 min with the lid ajar, until the beans are tender. At the 20 min mark, check the beans every 3 to 5 min to be sure that they do not overcook.  
  4. Quarter the tomatoes, and cut each quarter in half; place in large mixing bowl.
  5. When fully cooked, drain the beans and, while they are slightly warm, place them in the bowl with the tomatoes; toss gently with the basil vinaigrette.
  6. Divide the salad onto 2 plates.  Dress with microgreens and a healthy drizzle or two (or three) of extra vinaigrette.  Serve with a french baguette (which is particularly good when used to "mop up" the extra vinaigrette). 
Fresh beans are wonderfully creamy,
and they cook much faster than dried bean.

Ingredients for the basil vinaigrette:
  • 1/2 cup extra virgin olive oil
  • 1 1/2 tbsp red (or white) wine vinegar
  • 1 tbsp water
  • 1 small shallot, or 1 garlic clove, peeled and sliced
  • 1 tsp Dijon mustard
  • 3/4 tsp kosher salt
  • 3 or 4 cups loosely packed fresh basil leaves

Directions:
  1. Place olive oil, vinegar, water, shallot or garlic, mustard, and salt in the blender.
  2. Coarsely chop the basil leaves; place in blender.  (Don't let the basil sit once you cut it, or it will begin to discolor.)
  3. Cover the blender and mix on high-speed until the vinaigrette is smooth. If the dressing is too thick, add a little more olive oil (or water) to thin it out. 

Basil Vinaigrette (i.e., green gold!).

I cannot stop eating this salad -- the "richness" of the beans, the classic pairing of the basil vinaigrette with the fresh flavor of the tomatoes, the bread, the vinaigrette, and the spicy microgreens -- I just can't.  It's divine, and it's even better when served with a lovely bubbly rosé.  It's also extremely easy to throw together if you make the dressing in advance.  As an extra bonus, the dressing is a great way to use up extra basil, and it stores well in the fridge for about a week (just bring it to room temperature before you serve it).  So, really, there are no excuses!  Enjoy! 


Saturday, November 1, 2014

Steak Frites

Steak and potatoes.  So simple and rudimentary, it's almost boring.  But trust me, this is no stodgy meal.  The key to turning an average, everyday dinner into something extraordinary is to add a few delicious accompaniments that might just knock your socks off they are so good.  Start with high-quality ingredients and you will end up with a fantastic dinner  -- proof that alchemy is possible (at least perhaps in the kitchen).  This meal is a take on America's Test Kitchen's Steak Frites, which truly is as they claim, "the steak frites recipe of our Parisian dreams."

Over the years, America's Test Kitchen has reinvented their method of cooking steaks many times over, but none has rivaled the simple process of cooking steaks in a skillet.  They've told us to coat the steaks with 1 part cornstarch, 2 parts salt, freeze them, and then cook them on the grill.  They've recommended that we cook our steaks in a skillet and finish them in the oven.  More recently they say that it's better to reverse this process and start the steaks in the oven (to reach 95 degrees) and then finish them in the skillet (a reprise from previous years).  All of this nonsense in the name of obtaining perfectly cooked steaks risks ruining their credibility.  Which is ridiculous when they were right on the mark with their steak frites recipe in Season 11.... and that recipe couldn't be easier.  Simply cook the steaks in a skillet until they reach ~120 degrees F.  No fuss necessary.  (Of course, recreating the wheel is one of the better ways to produce 14+ seasons of ATK... but clearly, not all reinventions can be winners.)  I'm telling you, America's Test Kitchen's Steak Frites episode is near perfection.  My rendition is simpler but just as good as the original -- I swap out the fries for (ATK-approved) oven roasted potatoes that are crisp and delicious.

America's Test Kitchen recommends that, "Successful steak frites requires careful timing... Once you start cooking the steaks, you need to work quickly to get the steak and [everything else] on the table."  So take note -- you can make the herb butter and vinaigrette the day before or while the potatoes are roasting.  This way everything will be ready once the steaks are done to perfection.


Serves 2

Adapted from America's Test Kitchen's Steak Frites episode.

Side Salad with ATK's Foolproof Vinaigrette
I prepare this vinaigrette in a small jar, which makes quick work of the recipe by eliminating the need to whisk things together.  Also, see this entry from Serious Eats if you are ever curious about how to properly dress your salad. 

Ingredients
  • 1 tablespoon wine vinegar (red wine, white wine, or champagne vinegar will work)
  • ~3 teaspoons finely minced shallots (onion will also work)
  • 1/2 teaspoon mayonnaise
  • 1 teaspoon Dijon mustard
  • ~2 tablespoons minced fresh parsley
  • 1/8 tablespoon salt
  • 3 tablespoons extra virgin olive oil
  • pinch of sugar (if needed)
  • 1 teaspoon vinegar (if needed)
  • lettuce greens, washed and spun dry
Directions
  1. Combine vinegar, shallots, mayonnaise, mustard and salt in a small jar with a non-reactive lid or in a non-reactive bowl.  (If using a bowl -- whisk together until mixture is milky an no lumps of mayonnaise remain.) 
  2. If using a jar to prepare the vinaigrette, add the oil, close tightly with the lid, and shake well until combined.  (If using a bowl -- place olive oil in a small measuring cup so that it is easy to pour.  Whisking constantly, very slowly drizzle oil into the vinegar mixture.  If pools of oil gather on the surface, stop addition of oil and whisk mixture until well combined, then resume whisking in oil in a slow stream.)  Once mixed, the vinaigrette should be glossy and lightly thickened, with no pools of oil on the surface.  
  3. Adjust the seasoning to your liking, with a little extra vinegar, sugar, mustard, or salt as needed.  Set dressing aside for immediate use, or store it in the fridge for up to 1 week.
  4. Place salad greens in a large bowl and toss with dressing.  Finish the salad with a fresh sprinkle of salt (and pepper if you like).  

Oven Roasted Potatoes

Ingredients
  • 4 medium sized Yukon Gold potatoes (~1 lb)
  • olive oil
  • salt
Directions
  1. Cut the potatoes into ~3/4 inch cubes.
  2. Toss potatoes with olive oil in a large bowl.  Sprinkle with salt.
  3. Place potatoes on a baking sheet and roast at 375 degrees F for about 35-40 minutes.  The bottoms should be beautifully browned when done.

Herb Butter

Ingredients
  • 4 tablespoons butter, softened
  • 1/2 medium shallot, minced (~2 tablespoons)
  • 1 clove garlic, minced (~1 teaspoon)
  • ~2 tablespoons minced fresh parsley
  • ~1 tablespoon minced fresh chives
  • 1/4 teaspoon salt
Directions
  1. Combine all ingredients in medium bowl.  Set aside. 
  2. The herb butter can be stored for up to 1 week, sealed and in the fridge.  Bring to room temperature before use.

Steaks 

Ingredients
  • 2 boneless NY strip or rib-eye steaks (~.55 lbs each), steaks should be ~1.5 inches thick
  • vegetable oil
  • salt
  • pepper
Directions
  1. Heat vegetable oil in a 12-inch skillet over medium heat until smoking.
  2. Meanwhile, season steaks with salt and pepper.  
  3. Lay steaks in pan, leaving at least 1/4 inch between them.  Cook, not moving steaks, until well browned, about 3 minutes.  
  4. Using tongs, flip steaks and continue to cook about 3 minutes more until instant-read thermometer inserted into the center of the steaks reads 120 degrees F for rare to medium-rare.
  5. Transfer steaks to warmed plates and top with herb butter.  Let rest a few minutes before serving.


This might sound like a lot of work, but if you time things properly, you can have dinner on the table in under 90 minutes (even less if you prepare the butter and vinaigrette in advance).  And boy is it time well spent!

Serve this meal with a wonderfully rich Cabernet Sauvignon or Bordeaux.  Then... sit down, take a breath, and prepare to eat like a king/queen.  And at night, I can almost promise, you will dream of Paris.


Saturday, May 10, 2014

Carrot Salad with Harissa, Feta, and Mint

I recently found a blog that I wish I had found years ago.  It's called smitten kitchen.  The site is so popular that apparently the author now has a cookbook, highlighting a best-of list of recipes from her blog.  (Yes, this is very Johnny-come-lately of me.)  As you might imagine, the site has several fantastic recipes and beautiful step-by-step photos, which are especially helpful when in the process of cooking.

I found smitten kitchen when I was looking for another recipe (for a certain very well-known NY Times plum torte recipe, which I will write about at a later date), and it felt like fate.  While on the site, I decided to look for a salad with a fresh take, and I found a recipe that includes harissa, which I had never used before.  Harissa is a spicy, pepper-based condiment that is popular in northern Africa.  It has recently made a big splash in Europe, and now in the US.  I imagined that the heat from the pepper would create a nice base for this salad, with lemon and mint to lighten things up, and feta to cool things down.  Sounds great, right?  So, off I went to procure my ingredients and make the dish... and I've gotta say, this salad is fantastic.  I've made this recipe twice this week alone (I'm risking beta carotene poisoning, I know), first as written on the smitten kitchen website, then with a few modifications.  I prefer my version, and include it here.


Makes 4 to 6 servings

Ingredients:
  • 1 pound carrots, peeled, trimmed and coarsely grated 
  • 5 tablespoons olive oil
  • 1 crushed clove of garlic
  • 1/2 teaspoon caraway seeds or about half as much, ground (I used seeds but ground them first)
  • 3/4 teaspoon cumin seeds or about half as much, ground 
  • 1/2 teaspoon paprika
  • 3/4 teaspoon harissa (adjust to taste, and to the heat level of your harissa)
  • 1/2 teaspoon sugar
  • 4 tablespoons lemon juice
  • 2 1/2 tablespoons flat leaf parsley, finely chopped
  • 2 1/2 tablespoons fresh mint, finely chopped
  • feta, to taste, crumbled or chopped into bits

Directions:
  1. In a small sauté pan, cook the garlic in the olive oil until slightly golden.  Discard the garlic.
  2. Add the caraway, cumin, paprika, harissa, and sugar to the pan with the garlic-infused oil; heat on a low flame until fragrant, about five minutes. 
  3. Pour the oil and spices into a small bowl; add the lemon juice, and a pinch of salt.  Whisk together.
  4. Pour the dressing over the carrots; mix. 
  5. Add the herbs; mix. 
  6. Let the salad sit to infuse for an hour (or more); store in the fridge.
  7. Mix and add the feta before serving. 
This dish is delicious, and bright, and slightly sweet.  The feta is a great addition; it adds a touch of saltiness and, more importantly it smooths out any heat you get from the harissa.  But I have to say, the flavor of the harissa in this dish is very mild and understated, since it seems to meld together with the spices.  The lemon and herbs are more noticeable, lending a freshness to the dish.  Though the highlight of the salad is obviously the carrots, which add a hint of sweetness.  In my initial attempt at making this salad, I was in a bit of a hurry, and I used pre-grated carrots -- this was a big mistake.  I definitely recommend grating whole carrots by hand for this dish; they are so much sweeter and juicier, and the texture can't be beat.  In my experience the smaller, thinner carrots can be a hint sweeter (compared to the larger ones), so I tend to go for these.

As for the harissa, I've tried 3 brands at this point (Les Moulins, Mina, Dea), and they are all good.  Les Moulins has a smokier/sun-dried tomato flavor, while Mina has a more prominent red pepper flavor.  Dea is a bit sour at first, and then the pepper flavor kicks in.  The salad works well with all of them, and I found that the least expensive brand (Dea), at $3 for the tube from Citarella, works just as well as the others do in the salad.  All of these brands are a bit spicy, so if your palate prefers a more mild flavor, definitely reduce the amount of harissa you use or look for a mild harissa (Mina makes a mild version).  You could also make your own harissa, as there are a number of recipes out there to try (for example, see here, and here).


cumin, sugar, caraway, paprika, harissa (Les Moulins)

salad with freshly grated carrots

Enjoy!

Sunday, March 16, 2014

Mason Jar Salad

Salads are endlessly versatile, and they also allow one to make an attempt at healthy eating.  Even though it's still terribly cold in NYC, with winter not seeming to let up her icy grip, dreams of warmer, sunny days to come inspired me to prepare a summer salad.  I recently came across the concept of mason jar salads as the ideal "boxed lunch."  These salads, which are all the rage, are created in a mason jar, with the ingredients layered one on top of the other.  The dressing goes in first, at the bottom, and ingredients that could wilt in the dressing, like salad greens, go at the very top.  I love a good homemade lunch, lauded by the brilliant Mark Bittman, and these lunches have the added advantage of being very pretty.  So, of course I was game. 


Ingredients for a mason jar salad are easily customized.  In mine I added, in order:
  • 1 to 4 tablespoons of Blush wine vinaigrette (from BRIANNAS)
  • Red peppers, chopped
  • Grape tomatoes, quartered (optional)
  • Sauteed chicken breast, shredded
  • Cucumbers, chopped
  • Spring mix lettuce, torn in bite sizes
  • Raspberries
  • Pine nuts, lightly toasted
  • Croutons
Adjust the amount and type of ingredients to the size of the salad you are making and your personal preferences.  For more ideas on what you might include in your salad, click here and here.  And for more examples of mason jar meals/snacks, click here and here and here.
 
Directions:
  1. Add the dressing to the bottom of the jar.
  2. Add the salad ingredients that you like, layering each one at a time, with the more heartier ingredients added first, since they will hold up better than delicate ingredients (e.g., lettuce, fruit) when immersed in the dressing.  It's a good idea to leave a little space at the top of the jar to let the ingredients move around a bit if you plan to mix the salad in the jar before serving.
  3. Place croutons in a plastic container and set aside, since they will get soggy if added and stored with the other ingredients.
  4. Place the lid on the jar and store in the fridge for up to 4 days.
  5. Just before serving, add the croutons, place the lid back on the jar, and then shake the jar gently to mix the ingredients and distribute the dressing.  Enjoy!

The idea is that these salads can be prepared in advance and grabbed, on the go, for a quick lunch.  All one needs to do is (gently) shake the jar to mix everything up and voilà, salad in a jar.  Just don't forget to bring your salad with you on your way out the door, along with your fork, and those delicious croutons.

An important point to consider is the issue of the vinaigrette.  I've read that depending on how long you keep the salad, some ingredients might end up getting slightly pickled in the dressing.  If this does not sound appealing, you'll be happy to know that someone has created a little disposable plastic cup that can be purchased and placed at the top of the mason jar, which could be used to keep the dressing and salad separate (but this requires real mason jars, not the old pasta sauce jars I'm using).  I suppose you could also use another, smaller jar just for the dressing.  This time around, I decided to prepare two salads, varying the order of the ingredients in each, as a sort of test to see which items do better nearer to/farther from the vinaigrette.

I'm a little concerned that some of the ingredients were still a bit damp from washing when I added them into the jar, which could increase their chance of spoiling.  I will likely make more of an attempt to let them dry the next time around.  Still, this is a fun and tasty experiment (like so much of what happens in the kitchen and in life).  Fingers crossed that it all goes well!  Worst case scenario, I treat myself to a little takeout for lunch tomorrow.

UPDATE: Things did go well with my mason jar salad.  The salad was delicious.  The ingredients stayed fresh, and weren't the slightest bit pickled.  The only challenge was not getting bits of salad all over my desk since there is no wide bowl to catch what might fall off the fork.  So I just spread out a napkin, and was good to go!  Still, I decided that packing a salad in tupperware would be easier, as long as the dressing is stored separately.  But the jars are a bit more fun (and pretty).   

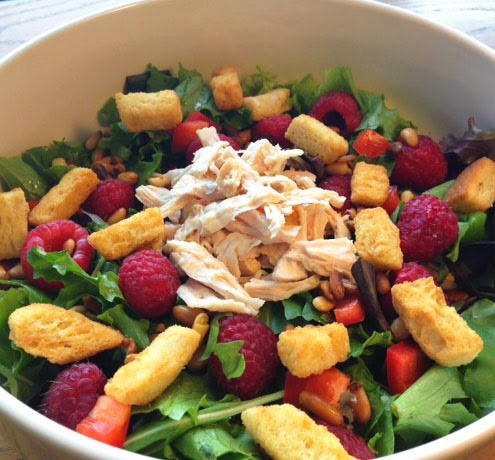
Good old-fashioned salad in a bowl