Friday, September 29, 2017

Baked Oatmeal Cups

These baked oatmeal cups come together really quickly. They are relatively healthy and they make breakfast and/or snack time a breeze for an entire week! The flavor of the overall “muffin” is not too sweet, but you can increase the sugar if you like. This recipe is easily tailored, depending on what fruits are in season. My personal favorite is to use peaches and when peaches are not in season, raspberries.


Adapted from The Kitchn 

Makes 12 baked oatmeal cups.

Ingredients: 
  • 2 tablespoons butter, melted (plus more for the muffin pan)
  • 2 large eggs
  • 1 1/2 cups milk (any kind; I used 2%)
  • 3 tablespoons brown sugar (lightly packed) (~45 grams) or 1/4 cup honey
  • 1 teaspoon vanilla extract
  • 3 cups old-fashioned oats (300 grams)
  • 1 teaspoon baking powder (5 grams)
  • 1 teaspoon ground Saigon cinnamon (2 grams)
  • 2 cups fresh raspberries or other fruit (e.g., peaches cut into 1/2 inch cubes; Concord grapes halved and seeded) 

Directions:
  1. Heat oven to 350°F. Grease the wells of a standard 12-well muffin tin well with butter.
  2. Melt 2 tablespoons of butter and let cool.
  3. Prepare your fresh fruit.
  4. Add eggs to a large bowl; whisk. Whisk in butter. Add milk, sugar, and vanilla; whisk until combined.
  5. Add the oats, baking powder, and cinnamon to the bowl. Stir until combined. The mixture will be soupy.
  6. Gently mix in your fruit.
  7. Divide the oatmeal mixture evenly among the muffin wells, ~1/3 cup per well, filling each one just to the top, making sure each well has a similar amount of liquid and filling.
  8. Bake at 350°F on middle rack until slightly risen, dry on top, and golden-brown, about 30 to 40 minutes. If using a fresh fruit that tends to release liquid while cooking (e.g., peaches), the “muffins” might require a longer baking time, about 45 minutes. Use a toothpick to test for doneness.
  9. Let the “muffins” cool in the pan on a wire rack for 10 minutes. Run a knife around each muffin, prying gently to remove. Place “muffins” on a rack to cool completely.


mise en place

soupy batter

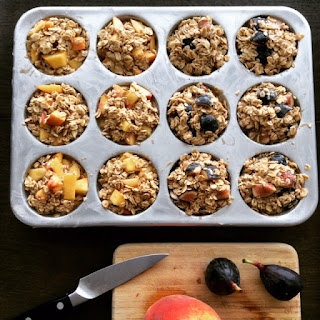
two types of oatmeal cups: peach and fig, ready to be baked

peach oatmeal cups, ready to be baked

Make it your own:

Add a few other ingredients to customize these oat cups to your liking.
  • Split the batter in half, adding a different type of fresh fruit to each half.
  • Add 1/2 cup unsweetened applesauce or mashed banana to further sweeten the batter (add in step 4).
  • Instead of fresh fruit, add 1/2 cup raisins or another dried fruit. For more texture, couple the dried fruit with 1/2 cup chopped nuts, coconut flakes, or chocolate chips (add in step 6). I imagine a batch with dried cherries, coconut flakes, and maybe some mini chocolate chips would be quite a treat. 


baked oatmeal cups: some with raspberries, others with Concord grapes

The Kitchn recommends: 

Storage: Muffins can be kept in an airtight container in the refrigerator for up to 5 days. 
Freezing: Individually wrap any muffins you won't eat within a few days in aluminum foil and freeze. Defrost overnight in the refrigerator. Once defrosted, they can also be reheated in the microwave for 30 to 45 seconds if you prefer them warm.

I keep mine on the counter for a day or two, while the rest remained in the fridge or in the freezer. I let those in the fridge come to room temperature on the counter (overnight) before eating them. The texture doesn't suffer at all. 

Enjoy!

Thursday, September 28, 2017

Old Fashioned Peach Cobbler


This recipe was adapted by my mother who found the original recipe in a newspaper some time ago, during the pre-internet era when home cooks relied heavily on the weekly Food section of the local newspaper for inspiration and delight. Fortunately, this recipe did not disappoint!

Summers, in my opinion, are not truly summers unless they include at least one peach cobbler. Make this recipe at the height of peach season and you just might agree.   


 Ingredients:
  • 2 1/2 pounds fresh peaches (~6-8 peaches, yield ~5 cups)
  • 1/4 teaspoon cinnamon
  • 1/4 cup + 2 tablespoons sugar
  • 1 cup flour
  • 1 1/2 teaspoons baking powder
  • 1/4 cup butter (i.e., 1/2 a stick), butter should be cold
  • 1/4 cup milk (2% is fine)
  • 1 egg

    Directions:
    1. Peel and cut up the peaches into ~8 slices each; place in the bottom of a 9x9 inch baking dish.
    2. Sprinkle the peaches with 1/4 cup sugar and cinnamon. Set aside.
    3. In a medium bowl, combine flour, 2 tablespoons sugar, and baking powder.
    4. Cut in cold butter with a pastry blender until course crumbs develop.
    5. Add milk and egg; stir until just moistened.
    6. Drop ~9 even spoonfuls of biscuit batter over the top of the peaches.
    7. Bake at 400° F for 25 min or until biscuits begin to brown. Test biscuits with a toothpick for doneness.
    a mix of white and yellow peaches from the farmers' market

    This cobbler is great served on its own or with a scoop of vanilla ice cream. Leftovers can be stored, loosely covered, on the counter for a day or so. Enjoy!!
     

    Thursday, February 9, 2017

    Venetian Cauliflower

    I have been meaning to try this NY Times recipe for Venetian Cauliflower for a few weeks now.  Fortunately, Storm Niko provided the perfect mid-week opportunity.  I tweaked this Ottolenghi-inspired recipe a bit, of course.  And now, without further ado...


    Ingredients:
    • 1 cauliflower, about 1 1/2 pounds
    • 4 tablespoons olive oil, plus 2 to 3 tablespoons
    • 1 large onion, diced
    • Pinch of saffron, crumbled and infused in 2 teaspoons hot water
    • 1/4 teaspoon ground cinnamon
    • 1 teaspoon fennel seeds
    • 1 teaspoon whole coriander seeds
    • Pinch of crushed Aleppo pepper (or crushed red pepper)
    • ¼ cup currants
    • 2 tablespoons dry sherry 
    • ½ cup dried cranberries (if they are very dry soak them in hot water for a few minutes, then drain)
    • 1 teaspoon lemon zest 
    • Salt to taste 
    • ¼ cup pine nuts, lightly toasted
    • 2 to 3 tablespoons lemon juice
    • 2 tablespoons chopped parsley
    Serves 4 to 6

    Directions:
    1. Roast the pine nuts in the oven on a cookie sheet lined with aluminum foil at 400 for 3 to 5 min, just until they take on a slightly toasted color.  Remove from oven and sprinkle with salt.
      toast your pine nuts
    2. Divide the cauliflower in quarters (cutting from top to bottom); remove the core.  Use a knife to separate the cauliflower into small florets of equal size.  Blanch florets in boiling water for 5 minutes.  Run under cold water; drain; set aside.
    3. Put 4 tablespoons of olive oil in a wide skillet over medium heat.  Add onion and cook, stirring occasionally, until softened and lightly browned, about 10-15 minutes.  
    4. Soak dried currants in sherry, and cranberries in hot water.  
    5. Grind fennel and coriander seeds into a fine powder using a mortar and pestle.
      soak your dried fruits and prepare your spices (mise en place)
    6. Add cinnamon, ground fennel, ground coriander, and Aleppo pepper to the skillet.  Let the spices toast briefly in the skillet.  Add saffron (with its liquid); stir.  
    7. Add cauliflower florets, currants (with liquid), cranberries (drained), and 1/2 teaspoon lemon zest (reserving the remaining 1/2 teaspoon).  Season with salt.  Toss gently to distribute.  Cover with a lid and cook for about 5 minutes more, until cauliflower reaches desired tenderness and flavors meld. 
    8. Transfer to a serving dish, dress with 2 to 3 tablespoons lemon juice and 2 to 3 tablespoons olive oil; sprinkle with 1/2 teaspoon lemon zest, roasted pine nuts, and parsley.  Serve warm or at room temperature. 

    The sweetness of the currants and earthy warmth of the spices (cinnamon, saffron, coriander) are perfectly balanced with the brightness of the cranberries and fresh lemon.  

    If you happen to have leftovers, this dish is a great remedy for those mid-winter desk lunch blues, so go ahead and add this one to the list (and to this list, and this one, and this podcast)! 

    Interesting fact:  Dried currants aren't actually currants...  Who knew?


    Monday, October 3, 2016

    Tomato and Fresh Shell Bean Salad

    This wonderful salad introduced me to the idea of cooking with fresh shell beans, and boy am I glad it did!  


    Many shell beans are the "just-picked" versions of beans that we normally use in dried form.  But compared to dried beans, fresh beans have a wonderfully creamy texture, are quite easy to prepare (no soaking required), and they cook in no time.  Fresh beans do need to be removed from their shell, but this is an easy task, especially when done on a lazy Sunday afternoon over casual conversation.  (Not feeling especially chatty?  Consider the task an act of "mindfulness.")  Fresh beans are available in the late summer/early fall at many farmer's markets.  I recently bought some from Berried Treasures at the farmer's market in Union Square.  These beans might not catch your eye in the market, unless you are in the know (and you are now in the know!).  I usually look for pods that look a little bit dried out, which is a sign that beans inside are plump and ripe.  But the stem should still be green, which is a sign that the bean was recently picked.  Fresh beans can be stored in a paper bag for a few days in the fridge.

    These unassuming beans should not be overlooked.

    Recipes adapted from: David Lebovitz's Fresh Tomato and Shelling Bean Salad and his Basil Vinaigrette

    Ingredients for the salad:
    • 2/3 to 1 cup of shelling beans, shucked (you could substitute fresh beans for dried or canned Great Northern beans, but where's the fun in that?!)
    • 4 small tomatoes
    • salt
    • a bay leaf or a few branches of thyme (optional)
    • microgreens, for serving (optional; I prefer a slightly peppery mix)
    • basil vinaigrette (see below)
    • french baguette, for serving
    Serves 2.


    Directions:

    1. In a small  saucepan, bring water to a boil, then add a dash of salt. 
    2. Add the beans and optional herbs to the pan.
    3. Reduce the heat to a low boil and cook the beans for 20-35 min with the lid ajar, until the beans are tender. At the 20 min mark, check the beans every 3 to 5 min to be sure that they do not overcook.  
    4. Quarter the tomatoes, and cut each quarter in half; place in large mixing bowl.
    5. When fully cooked, drain the beans and, while they are slightly warm, place them in the bowl with the tomatoes; toss gently with the basil vinaigrette.
    6. Divide the salad onto 2 plates.  Dress with microgreens and a healthy drizzle or two (or three) of extra vinaigrette.  Serve with a french baguette (which is particularly good when used to "mop up" the extra vinaigrette). 
    Fresh beans are wonderfully creamy,
    and they cook much faster than dried bean.

    Ingredients for the basil vinaigrette:
    • 1/2 cup extra virgin olive oil
    • 1 1/2 tbsp red (or white) wine vinegar
    • 1 tbsp water
    • 1 small shallot, or 1 garlic clove, peeled and sliced
    • 1 tsp Dijon mustard
    • 3/4 tsp kosher salt
    • 3 or 4 cups loosely packed fresh basil leaves

    Directions:
    1. Place olive oil, vinegar, water, shallot or garlic, mustard, and salt in the blender.
    2. Coarsely chop the basil leaves; place in blender.  (Don't let the basil sit once you cut it, or it will begin to discolor.)
    3. Cover the blender and mix on high-speed until the vinaigrette is smooth. If the dressing is too thick, add a little more olive oil (or water) to thin it out. 

    Basil Vinaigrette (i.e., green gold!).

    I cannot stop eating this salad -- the "richness" of the beans, the classic pairing of the basil vinaigrette with the fresh flavor of the tomatoes, the bread, the vinaigrette, and the spicy microgreens -- I just can't.  It's divine, and it's even better when served with a lovely bubbly rosé.  It's also extremely easy to throw together if you make the dressing in advance.  As an extra bonus, the dressing is a great way to use up extra basil, and it stores well in the fridge for about a week (just bring it to room temperature before you serve it).  So, really, there are no excuses!  Enjoy! 


    Sunday, October 2, 2016

    Madeleines

    Madeleines have been on my "to-bake" list since I was in high school.  All I needed was the proper pan, a few handy gadgets (pastry brush, 1.5 tbsp scoop, microplane -- okay these last two were not absolutely necessary, but you know how it is with kitchen items), and a spare hour or two.  With a quick visit to one of the fantastic restaurant supply stores in lower Manhattan, I had everything I neededAnd so now, without further ado...


    Recipe adapted from: hungry sofia and Sur La Table's blog.  Original recipe found in From Julia Child’s Kitchen.

    Ingredients:
    • 2 large eggs, beaten
    • 2/3 cup sugar
    • 1 cup unbleached, all-purpose flour
    • 1 stick + 1 1/2 tbsp unsalted butter
    • Pinch of salt
    • 1 tbsp flour (for coating pans)
    • 1/2 tsp pure vanilla extract
    • Grated lemon zest from 1/2 lemon
    • 3 drops of fresh lemon juice (not more, trust me)
    Makes: a little less than 2 dozen madeleines.

    Directions:

    Note: All ingredients should be brought to room temperature before mixing so that the melted butter does not congeal in the batter before the ingredients have blended together.

    1. In large mixing bow, combine sugar, flour, and salt.  Add lightly beaten eggs to the dry ingredients and mix with a wooden spoon to blend into a heavy paste.  Set aside for 10 minutes.
    2. In a small pan, bring butter to a boil until it begins to brown ever so slightly; transfer immediately to small bowl.
    3. Combine 1 1/2 tbsp of the browned butter with 1 tbsp of flour in a tiny bowl and set aside.
    4. Place the remaining butter in the fridge for 5 to 10 minutes, while you paint the madeleine pans with a light coating of the butter/flour mixture.  Brush out any butter/flour mixture that pools at the bottom of the forms.  Place madeleine pans in freezer if you have room.
    5. Stir cooled butter, vanilla, grated lemon zest, and lemon juice into flour/sugar/egg paste with a wooden spoon.  Go slowly at first to avoid splashing the butter.  Don’t over mix.
    6. Cover the batter with plastic wrap and let it rest for about an hour (up to 3 days) in the fridge.
    7. Preheat oven to 375°.  Remove madeleine pans from the freezer.  Drop a rounded heaping tbsp of batter into each well at the deepest point of the form.  Do not spread batter to fill the mold.
    8. Set the pans on the middle rack and bake for about 15 minutes until cakes are puffed up in the middle and browned around the edges.
    9. Cool the pans for a minute or two and then tip the pans onto a cooling rack to unmold the cakes, gently nudging cakes with an offset spatula if necessary.
    10. (optional) Dust cakes with powdered sugar if desired, or dip in a lemon glaze made with 3/4 cup powdered sugar, 1 tbsp freshly-squeezed lemon juice, and a little water, as per David Lebovitz. Or you can use 1 cup sugar to 1/4 cup lemon juice, as per Dorie Greenspan.  Dorrie suggests that you dip the bump side of each madeleine in the glaze and put them bump side up on the cooling rack.  Then place rack in the oven, and watch carefully, as it only takes 1 to 3 minutes for the glaze to melt; remove the cakes from the oven at the first sign of a bubble in the glaze.  Place the cooling rack on kitchen towel or trivet (to protect your countertop) and let the cakes cool to room temperature.


    Serving: Traditionally, madeleines are served with tea, but they are delicious paired with many beverages from coffee to Cognac. The cakes are best slightly warm, fresh out of the oven when their edges are still crisp, but these madeleines also hold up well for a few days.

    Storage: When cool,
    madeleines can be stored in a covered container, or wrapped and frozen for later.  Glazed madeleines are best left uncovered, or loosely wrapped.  Note that glazed madeleines should not be frozen, since the glaze will melt.

    Compared to the number of overly complicated madeleine recipes there are out there, this one is a cinchEqually important, the cakes are delicious and moist, the crumb is just right, and there is a proper hump (for those who care about these things)I was hoping, perhaps, that by making these cakes I might conjure up the muse that Proust wrote about.  I cannot report any particularly transforming experiences, but I will say that I did enjoy these cakes thoroughly.  Thank you, Julia!

    Saturday, October 1, 2016

    Fresh Corn Polenta with Sausage Ragu

    Well, it's been a little while...  I'm returning to this forum with a much-loved recipe for fresh corn polenta and sausage ragu that is just perfect for this time of year. 


    Make this meal in the late summer or early fall, when corn and tomatoes are at their peak and most abundant.  It's such a delight to buy this type of produce from the farmer's market, and this recipe is the perfect blend of late summer produce and fall sentimentsI like to get my sweet Italian sausage from Harlem Shambles, on 116th Street. They make their sausages fresh, on site (with a proper amount of fennel seeds, which is so important to this recipe), and they’re delicious. 

    What luck! My local farmer's market offers an
    equal amount of splendor as, but smaller
    crowds than some of the larger
    markets in the city.

    Recipe adapted from Yotum Ottolenghi's Sweetcorn Polenta with Sausage Ragout for The Guardian.

    Ingredients:
    • 3-4 corn cobs, husks removed
    • chicken bouillon (or 2 cups chicken stock)
    • 1 1/2 tbsp butter
    • 2/3 cups polenta
    • olive oil
    • 5 sweet Italian sausages, skins discarded, meat broken into 1" pieces
    • 1 large onion, peeled and roughly chopped
    • 2 garlic cloves, peeled and crushed
    • 1 tsp paprika
    • 1 tsp cumin seeds, toasted and lightly crushed
    • 1 tsp ground coriander
    • 1 tbsp tomato paste
    • 1/4 tsp harissa paste (optional; I use Dea harrisa)
    • 6 large plum tomatoes or 5 medium/large tomatoes, roughly chopped
    • a small bunch of cilantro sprigs, tied with string (plus additional leaves to serve; optional)
    • fresh basil for serving (optional)

    Directions:
    1. Fill a medium saucepan with ~2.5” of water and bring to a boil. Cook the cobs for five minutes, until just cooked (if using frozen corn, this step can be omitted). Remove to plate to cool. Use the cooking water from the corn to make 2 cups of chicken stock from bouillon (e.g., I use Better than bouillon). When cool enough to handle, hold each cob vertically on a board and use a serrated knife to shave off the kernels.
    2. Add to the stock 1/2 cup water and butter. Bring to a boil, turn down the heat to medium, add the polenta and corn, and stir frequently; cook according to package directions until the mix is the consistency of thick porridge (my package said to cook the polenta for 40 min). Use an immersion blender to create a smooth porridge; set aside. If need be, reheat just before serving.
    3. On a medium-high flame, heat the olive oil in a large sauté pan or Dutch oven for which you have a lid. Add the sausage meat and onion and fry for 8 minutes, stirring a few times, until the meat is golden-brown and the onion is soft. Stir in the garlic and spices, and cook for 2 more minutes before adding the tomato paste, harissa, tomatoes, 1 1/3 cups water, and the cilantro bundle. Bring to a boil, turn down the heat to medium high, simmer for 30-45 minutes until the sauce is nicely thick and rich, then remove from the heat and discard the cilantro.
    4. Spoon the warm fresh polenta into individual bowls. Top with the ragu. Serve with a final sprinkle of cilantro or fresh basil (and a glass of red wine).
     
    Storage: Store the polenta and ragu separately in the fridge for up to a week; leftovers heat up well in the microwave (discard any congealed fat from the ragu first).

    This ragu is rich, with a depth of flavor that develops beautifully over its relatively short cooking time.  The onion lends sweetness, while the spices add warmth and a slightly unique character.  The fresh herbs add a brightness and tie everything together.  Against all of this, the mild sweetness of the polenta is the perfect complement to this rich tomato sauce.  Like many of Ottolenghi's recipes, this one succeeds in blending a variety of flavors together in an unconventional, yet somehow most familiar and intuitive way.  If you've never made one of Ottolenghi's recipes, I suggest trying this one.  It's forgiving, relatively uncomplicated, and full of flavor.  I think you'll love it!